Press SMART Board Tools  in the Dock, and then select Open > Screen Capture Toolbar in the menu bar.
SMART Notebook 10 for Mac Operating Systems
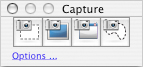
The Capture toolbar appears on top of active programs and Web browsers. It enables you to take a screen capture of an image in any window and automatically insert it on a page in a .notebook file.
Press SMART Board Tools in the Dock, and then select Open > Screen Capture Toolbar in the menu bar.
The Capture toolbar appears.
Press Area Capture  in the Capture toolbar.
Press and drag a rectangle on the screen to define the area you want to capture.
An image of this area appears on a page.
Press SMART Board Tools in the Dock, and then select Open > Screen Capture Toolbar in the menu bar.
The Capture toolbar appears.
Press Full Screen Capture  in the Capture toolbar.
An image of this screen appears on a page.
Press SMART Board Tools in the Dock, and then select Open > Screen Capture Toolbar in the menu bar.
The Capture toolbar appears.
Press Window Capture  in the Capture toolbar.
Select the window that you want to appear in the screen capture.
An image of this window appears on a page.
Press SMART Board Tools in the Dock, and then select Open > Screen Capture Toolbar in the menu bar.
The Capture toolbar appears.
Press Freehand Capture  in the Capture toolbar.
Press and drag a shape on the screen to define the area you want to capture.
An image of this area appears on a page.
Press Close  in the Capture toolbar.