Creating custom Creative pen styles
SMART Notebook software includes eight Creative pen styles (see Writing or drawing digital ink). In addition to these styles, you can create your own styles using pictures or objects on the currently selected page.

 To create a custom Creative pen using a picture
-
Press Pens  .
.
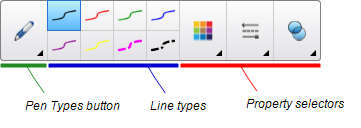
The Pens tool buttons appear.
-
Press Pen Types, and then select Creative Pen.
-
Select a line type.
-
If the Properties tab isn’t visible, press Properties  .
.
-
Press Line Style.
-
Select Use a custom stamp image.
-
Click Browse.
The Insert Image File dialog box appears.
-
Browse to and select the picture you want to use for the Creative pen style.
-
Press Open.
-
Write or draw digital ink on the page.
Tip
-
To resume using the default line type, select Use the default pattern.
-
If you want to save your custom Creative pen style for future use, press Save Tool Properties. You can later reset the Creative pen style (see Customizing the toolbar).
To create a custom Creative pen using an object
-
Press Pens .
The Pens tool buttons appear.
-
Press Pen Types, and then select Creative Pen.
-
If the Properties tab isn’t visible, press Properties .
-
Press Line Style.
-
Select Use a custom stamp image.
-
Press Select object, and then select an object on the page.
-
Write or draw digital ink on the page.
Tip
-
To resume using the default line type, select Use the default pattern.
-
If you want to save your custom Creative pen style for future use, press Save Tool Properties. You can later reset the Creative pen style (see Customizing the toolbar).
 SMART education software for Windows operating systems


