Rotating objects
You can rotate objects on a page by using the rotation handle or the rotating gesture (if your interactive product supports multitouch gestures).
Using the rotation handle
 To rotate an object
-
Select the object.
-
Press the object’s rotation handle (the green circle), and then drag it in the direction you want to rotate the object.
To rotate multiple objects
-
Select the objects.
A selection rectangle appears around each object.
-
Press the rotation handle (the green circle) on any one of the selected objects, and then drag it in the direction you want to rotate the object. When you rotate one object, all other selected objects rotate automatically.
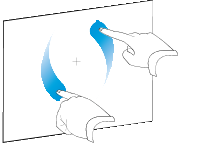
Using the rotating gesture
To rotate an object around its center
-
Select the object.
-
Using one finger on each hand, press the screen at opposite ends of the object.
-
Move your fingers in a circle around the center of the object to rotate it.
To rotate an object around a corner
-
Select the object.
-
Using one finger on each hand, press the screen in the corner you want to rotate the object around.
-
Move your fingers in a circle around the corner to rotate the object.
To rotate multiple objects
-
Select the objects.
-
Using one finger on each hand, press the screen at opposite ends of one of the objects.
-
Move your fingers in a circle.
Note
The objects rotate around their centers regardless of where you press the screen.
 SMART education software for Windows operating systems


