Product icon Education Software 2013 Windows
You are here: The basics > Getting started with SMART Notebook software > Creating and working with basic objects > Creating straight lines and arcs

Creating straight lines and arcs

You can use the Lines tool to draw straight lines and arcs.

You can add a line to your page, and then edit its properties. Alternatively, you can customize the line, and then add it to your page.

To create a straight line or arc

  1. Press LinesLines icon.

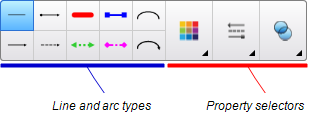
    The Lines tool buttons appear.

    Lines tool buttons

  2. Select a line or arc type.

  3. Optionally, customize the line or arc type using the property selectors.

    Note 

    You can also customize the line or arc type using the Properties tab (see Changing objects’ properties).

  4. Create a line by pressing where you want the line to start and dragging to where you want the line to end.